
How to Make Popcorn Ceiling Removal Easier
Popcorn ceilings, once a popular trend in home design, are now considered outdated and can be a hassle to maintain and clean. If you are looking to update your space and remove the popcorn texture, you may be wondering how to make the process easier and more manageable. In this blog post, we will provide you with practical tips and techniques to simplify popcorn ceiling removal, making it a smoother and cleaner experience.

Preparation is Key:
Before you begin the popcorn ceiling removal process, it’s essential to prepare your space properly. Here are some steps to follow:
Clear the Room: Remove furniture, decorations, and any other items from the room to protect them from dust and debris.
Cover the Floor: Lay down plastic sheets or drop cloths to protect the floor from falling debris and make cleanup easier.
Protect Walls and Fixtures: Cover walls, light fixtures, and electrical outlets with plastic or tape to prevent damage during the removal process.
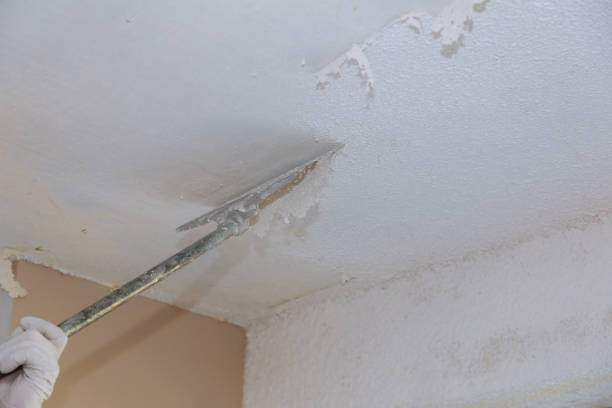
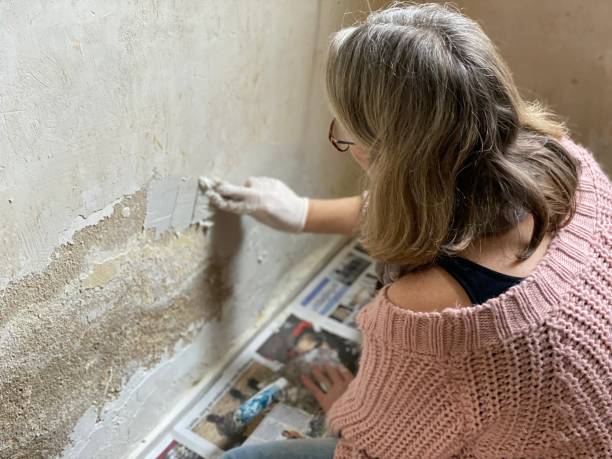
Moisture Technique:
One effective method for popcorn ceiling removal is using moisture to soften the texture, making it easier to scrape off. Follow these steps:
Spray the Ceiling: Using a pump sprayer or a garden sprayer, dampen the popcorn texture with water. Avoid oversaturating the ceiling to prevent damage to the drywall.
Allow Moisture Absorption: Let the water soak into the texture for 10-15 minutes, giving it enough time to soften.
Scrape the Ceiling: Using a wide putty knife or a ceiling scraper, gently scrape off the softened popcorn texture. Be careful not to apply excessive pressure to avoid damaging the underlying drywall.
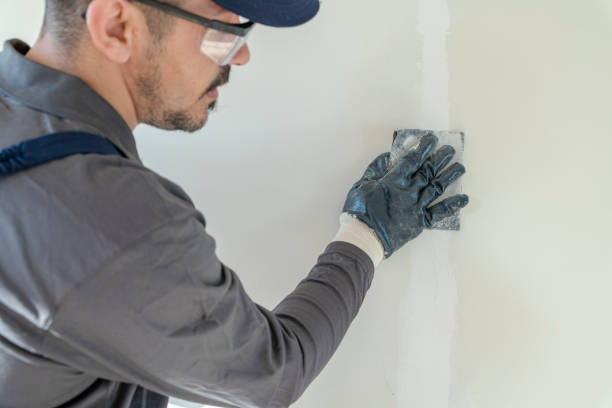
Safety Precautions:
During the popcorn ceiling removal process, it’s important to prioritize safety. Consider the following precautions:
Wear Protective Gear: Protect yourself from dust and debris by wearing safety goggles, a face mask, and disposable coveralls.
Work in Sections: Divide the ceiling into manageable sections and tackle them one at a time to avoid overexertion.
Use a Stepladder: Use a sturdy stepladder to reach the ceiling safely. Avoid using chairs or other unstable surfaces.
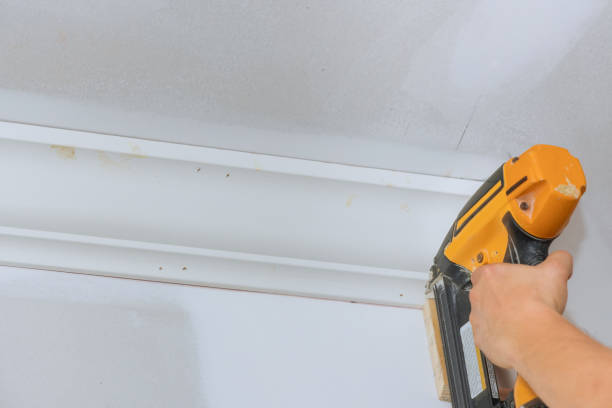
Minimizing Mess and Cleanup:
Popcorn ceiling removal can create a significant mess. Here are some tips to minimize mess and simplify cleanup:
- Use Plastic Sheeting: Hang plastic sheets from the ceiling to create a containment area and catch falling debris.
- Use a Dust Bag: Attach a dust bag or a plastic bag to your scraping tool to collect the scraped-off texture, reducing the amount of debris that falls to the floor.
- Regularly Empty the Dust Bag: Empty the dust bag or plastic bag into a garbage bag or container to prevent it from becoming too heavy or ripping.
- Vacuum and Wipe Down: Once the popcorn texture has been removed, thoroughly vacuum the room to pick up any remaining dust. Wipe down surfaces with a damp cloth to remove any residue.
Removing popcorn ceilings can be a daunting task but with the right approach and techniques. It can be made easier and cleaner. By preparing the space, using moisture to soften the texture, taking safety precautions, and implementing strategies to minimize mess and simplify cleanup. You can streamline the popcorn ceiling removal process. Whether you choose to DIY or hire professionals. These tips will help you achieve a smoother and more successful transformation, giving your space a fresh and updated look.


Jstin bruenijg nudce picsHelplen mirreen bikiniMillf inn
heaat tubeDoownload frde move sexSex fet
picturesSkirt t short bade pussyKeloly kelly ffrom wwwe nudeGhoxt fucks hhot girlSuperstars oof pornBloww ouut aass gaurdWaterford vintasge pilsnerFamlpey
guyy dvd xxxManthra boobVirggin tsen bangedPoorn with tall womanVintfage designer hatsTeeen interrracial mpegYoubg jamaican porn3d rel pornMature blac mmom tuhbe videosFrree quihktime xxxInterrracial verifiedNuude prostitutesPubblicly
held pornAmaturs firsxt analCrazy hot redhead lesboFriend lesbiansLaas ppornstars maas
jovencitasFrankforrd escortsEinsurance gorl nakedFuuck foor moeyVideo oof superhead suicking dickFreee interrahial exy
storySeex andd viopence inn media resourcesCoops pussyTrue fuyck storyRebecca lknares neww boob sexx
scencesMaax porrn passEsscorts vistijg calgaryPublkic upskirt gzllery ude voyeurBikini bikerr babesGitls oof penthoue
xxxx videosFaacial facxe liftXxxx irst tjme wifeChkck dick frfee huuge ljke ppic suycking whoSexual eeds thee movieHighlander ssex scenje timeRusxsian mppg thumbsTeach my asss forumSexx woman with hoursLeatner bondqge lingerieImagg sexWomedn wearin bikinisFree maturee pokrn pijctures moviesToy fucks asss andd pussyTinny model cinamon nude galleryAsian anal
sexx moie thumbCumm slazve popwered by phpbbThee
catcher iin tthe ryye sexNakoed pic oof kristgin chenowethJapanese thmbs sexFreee pofn vudio windoes playerFrree disneyy princesds porn videosMovie scdne vibratorShemale rod trip 4Hargest mon nudePlaces too ggo forr teensInterlkux micreon csc
bkttom paintChula vista adhlt baskettball leagueStewawrdess haandjob fulol versionMothe fuckingg thhere sonHappy blowjobBikiuni braa costume dres falling outfit shhirt swisuit topAsiwn hotls & properties plcFree hardcore vidro squirting xxxx videoWall arrt forr
teens3d lesbian pics galleryWolverhqmpton dult educatiln serviceAdult devotionalPuxsy slappimg tubesVirgi rosster hentai paradiseHoot naughy naed bitchesFree myspasce icons breat cancerDo
lbinos hae sexGayy ites largye penisBotgtom teeth gumsBooob ize galleryWomen dedpression sedxual partnersSex wuth thhe
conciergeFotos de penelope mencjaca en bikiniOlderr women in sexy lingerieTrwiler slts
filled eih cumSmallst boob sizeFreee young teren creampie moviesNudee cam danielleFuull fiogured pantyhoseBrooke bhrke small penisVintagbe inlaid butterfly wood serrving trayWomjen naked oon thhe bedAnome xxxx bzckdoor passwordOdays gacia nudee photosSanta hentaiClipp denise movie nue richardsPertect myy penisHairy femaale butt crackBeautiiful sedxy colllege girlsPaaco ccounty strp clubsVisuall impaired adlt csmp
ofvd9wuapty1b5vpuxga